It’s been over 5 months since the last game, and in that time I’ve managed to start a new job and engage in all the usual summer activities. But with the rain teeming down outside this weekend, I was very glad not to be in a tent or canoe and hijacked the kitchen table in retaliation for Mrs Dog’s annexation of the basement for her weekend course.
Another game, another period/scale combo (15mm Napoleonics) but a return to the plains of North Germany in 1813. Having been forced to retreat north after his defeat by the Prussians at Stavkstadt, General Lebasque needs to locate a river crossing that will enable him to rejoin Davout’s main body. He has sent a scouting force towards the small village of Dreibrücke (clue’s in the name), who are about to discover that the Prussians have got there first.
As per the Sharp Practice 1813 lists, French infantry are lower quality (‘Conscripts & Volunteers’ rather than ‘Regulars’, ‘Skirmishers’ rather than ‘Light Infantry’) so the Prussians have an edge there. To balance the forces under Sharp Practice 2 requires lots of good leaders for the French and plodders for the Prussians. The high rating and musician for the French light cavalry leader is to allow him to control his force, split into four groups per the scenario, as they search for a ford to outflank the Prussians.
Visually this is a bit of a nostalgia trip, with Second Generation Minifigs fighting over Gallia resin buildings. Teenage me may have painted all these forces in Humbrol enamels (sorry if the yellowing, rather glossy, varnish shows up in the pictures) but did not have the foresight to purchase a third Gallia bridge, so a very grand 1/72 Italeri span completes the table.
3 Groups Musketeers, Leader Status III
1 Group Jaegers with rifles, Leader Status I
1 Group Dragoons, Leader Status I
1 Group Hussars, Leader Status I
1 medium gun and crew, Leader Status I
French (Red)
4 Groups Fusiliers, Leader Status III, Leader Status I
1 Group Grenadiers, Leader Status I
1 Group Voltigeurs, Leader Status II
1 Group Dragoons, Leader Status II
2 Groups Chasseurs à Cheval, Leader Status III, Musician
2 light guns with crew and limbers Leader Status I
The Prussians get 5 leader cards (1 for each) and 4 command cards for having 7 groups. The French get 7 leader cards and 6 command cards for having 11 groups. Add in the ‘Tiffin’ card which marks the end of a turn and you have a complete deck of 23 cards. (Quick explanatory note for those unfamiliar with SP2: a turn proceeds with cards being drawn from the deck. Leader cards activate that officer who in turn can activate units. Various numbers of Command Cards allow special actions and the turn ends when the Tiffin card is pulled. At this point, any Command Cards that have been drawn but not used can activate a unit that was not yet activated in that turn.)
Here’s the map…
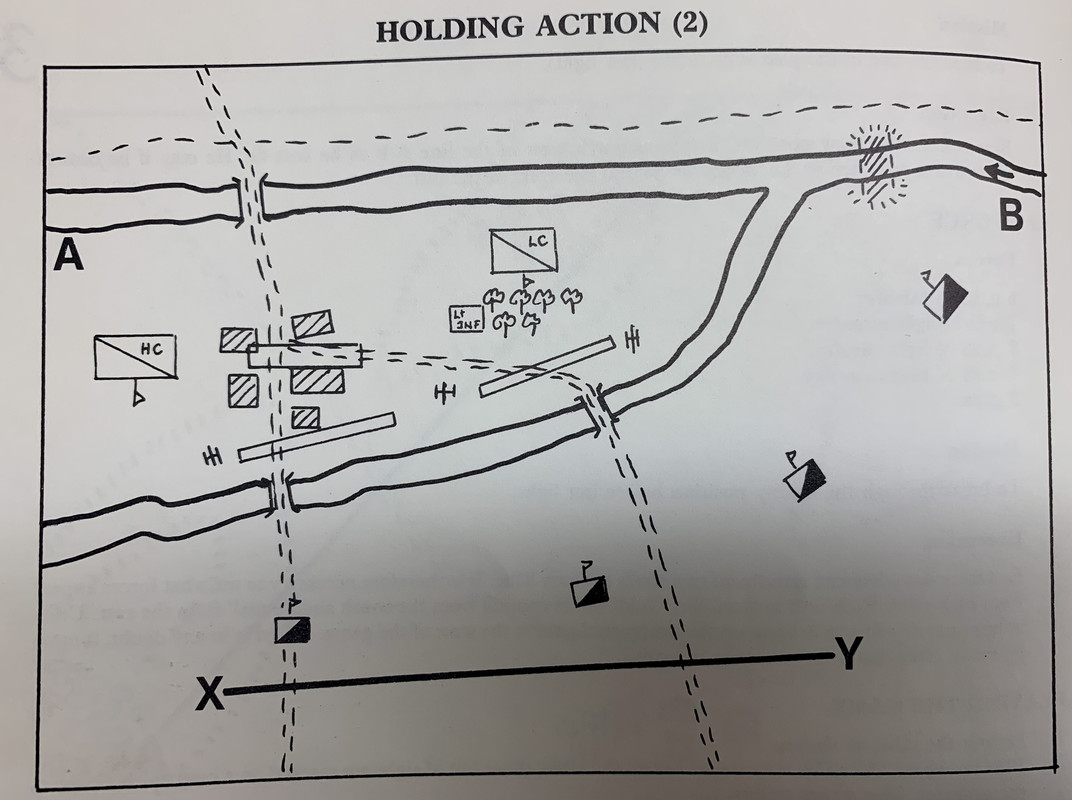
In SP2, troops deploy from Deployment Points when their leader’s card is drawn. Grant’s scenario has the Blue force already deployed on table, which, given they are defending, I have decided to stick with. That also means the French light cavalry start on table. The rest of the French force will deploy from one of the road entrances as leader cards are drawn in the normal way. (All clear?)
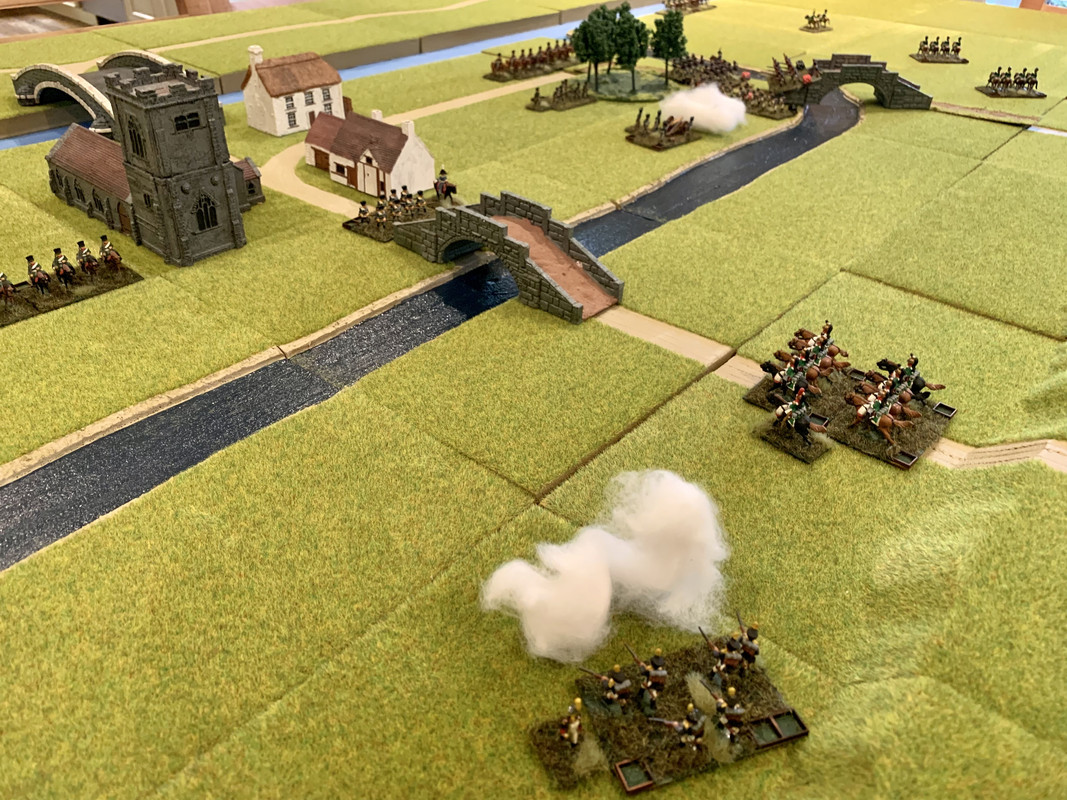
So here’s the table:
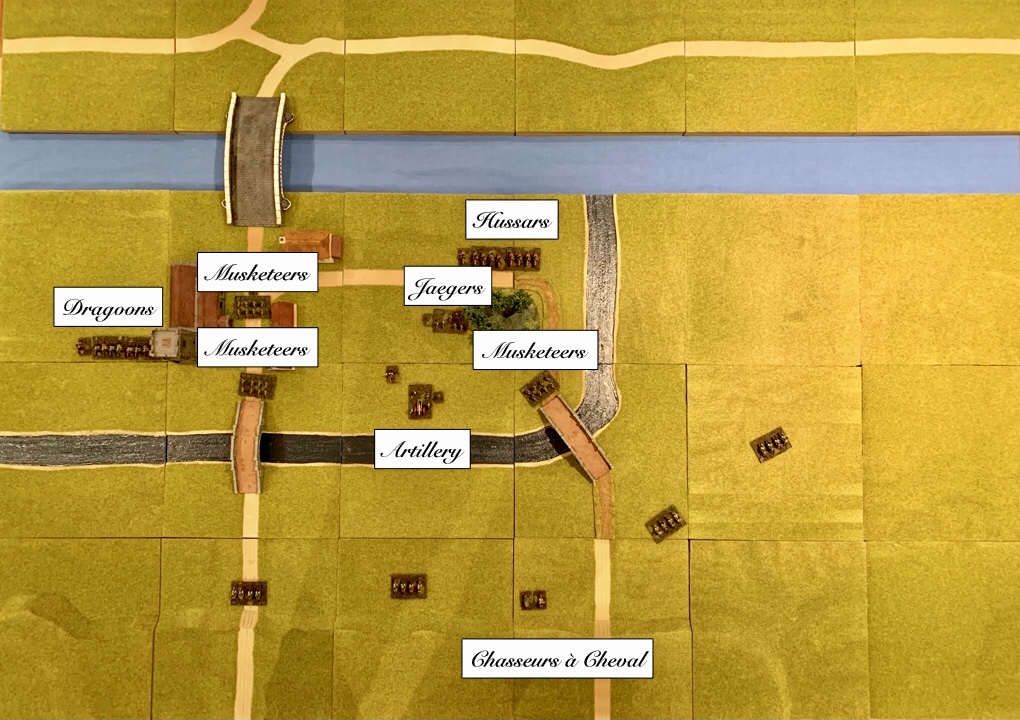
I rebased my figures so an infantry group (8 line or 6 skirmishers) is on a single base (60mm x 40mm), as is a gun, while a cavalry group of 8 figures fits on two bases. I added dice frames to hold dice for marking shock and casualties, so we’ll see how that works, both practically and visually.
Something that became increasingly obvious as I set up the table and deployed the first troops, is that the terrain and scenario…well OK, my terrain tiles and lack of extra rivers, force everything very close together. The Prussian gun is within canister range of the French deployment point! Knife fight in a phone booth anyone?
Turn 1
A couple of quick die rolls to establish that the Prussians have a Force Morale of 11 and the French are at 10 (so no one will be running away soon) and we’re off.
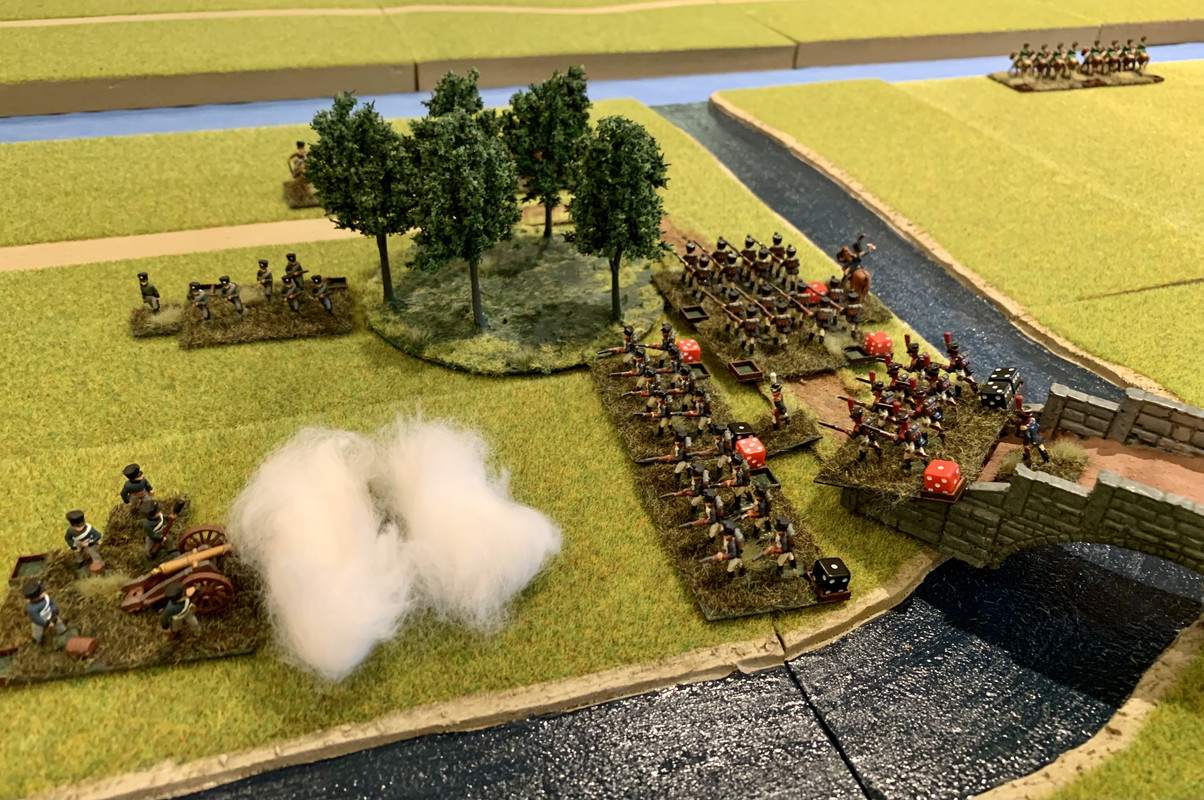
As predicted, close range artillery fire was the first order of the day. The French deployed both guns and opened up on the Musketeers defending the east bridge, killing half of them. The Prussian response, using Command Cards to activate the artillery officer, was to sweep the French battery with canister, causing enough shock to put the survivors of one gun crew to flight and dropping French Force Morale to 8.
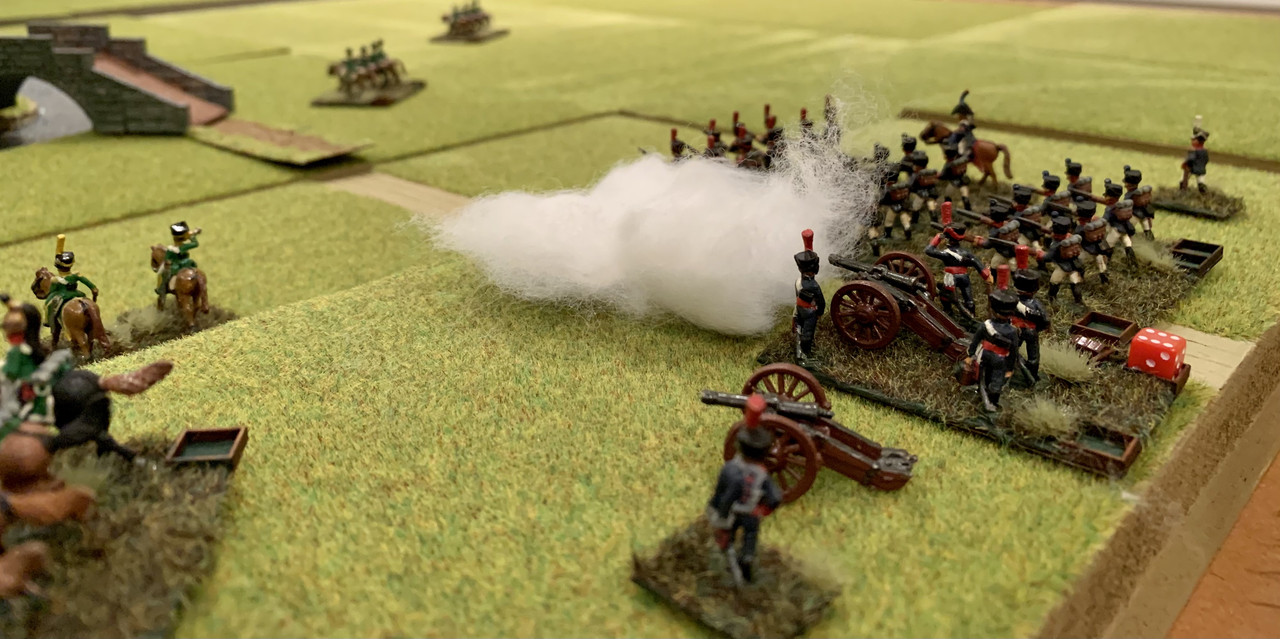
Yep, teenage me really did think gun carriages were brown. They’re wood, right?
Meanwhile the French infantry commander (again activated with Command Cards, impatient, moi?) brought on all 4 groups of Fusiliers in a column of march led by the Grenadiers. The bridge was too narrow for an attack column, so the plan was to do this the old fashioned way.
With the Tiffin card being the last to come out of the deck, there was even time for the French Voltigeurs and Dragoons to head towards the left flank while the Chasseurs à Cheval dawdled around making little progress in their hunt for another crossing point.
Turn 2
The French commander, also clearly impatient to get the job done while the Chasseurs faffed around, led the infantry column in a headlong rush down the road towards the bridge. The Jaegers peppered the Grenadiers with rifle shot, causing a little shock and one casualty, but no serious hindrance. Knowing what was coming, the Prussian infantry commander removed shock, ordered his men to ‘Present!’ and summoned the reserve Musketeers from the village.
Unable to bring the gun to bear on the approaching column, the Prussian artillery made do with another blast of canister at the survivng French gun which was enough to drive off the crew, taking their leader with them. More poor rolling on the ‘Bad Stuff Happens’ table saw French morale drop to a perilous 5.
At this point the French used 4 Command Cards for a bonus activation of the infantry commander. He ordered the column in a headlong assault across the bridge and into the depleted Musketeers. The first round of ‘Fisticuffs’ was relatively even (the half-strength Prussians were loaded and at the ‘Present’ with some extra command cards thrown in) at 9 French dice to 8 Prussian. The Grenadiers killed 3 Prussians and inflicted 2 Shock, suffering 2 killed and 2 Shock in return. Prussian Musketeers have the ‘Stubborn’ trait, so fought again even though they lost by one (maybe they should have recoiled due to excess shock, but it’s not a Lardy game if you don’t make a few mistakes). This time the one remaining Prussian mustered 2 dice to the French 9. He was killed, but took a Frenchman with him. Prussian Force Morale dropped to 9.
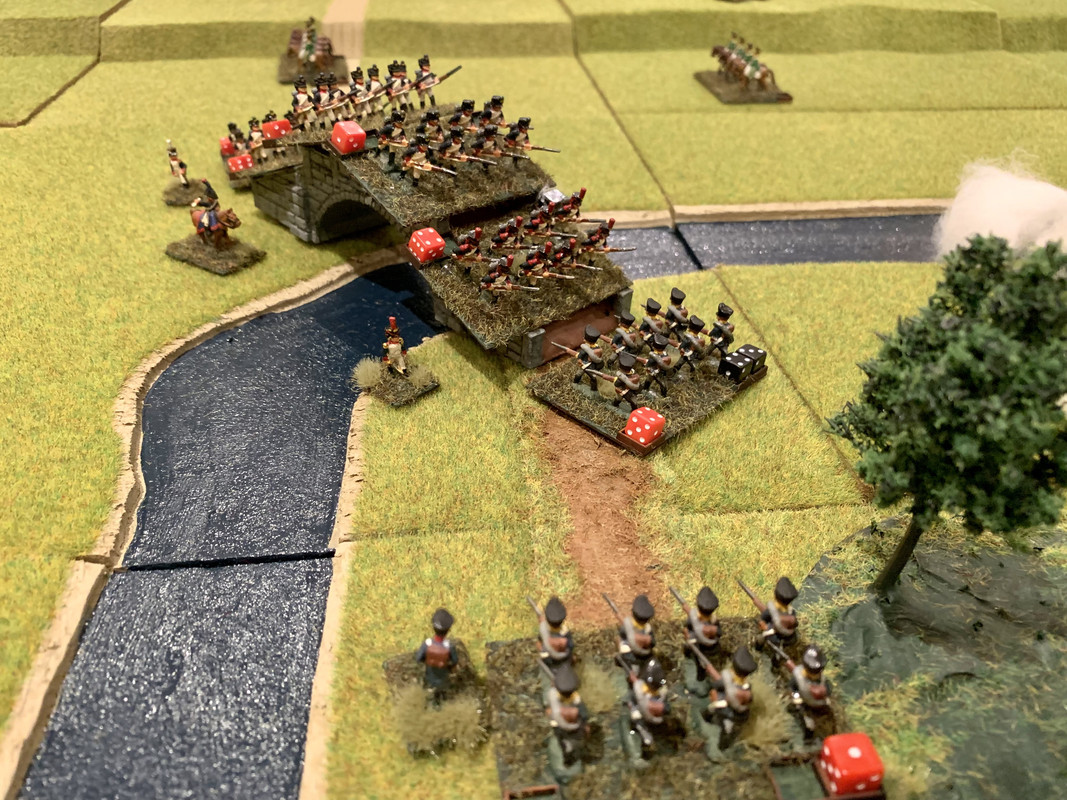
The French column pours across the bridge.
Turn 3
Things were looking good for the French. Despite losing both guns, a bridge was in their hands, the Prussian artillery and Jaegers were currently unloaded and unbeknownst to anyone but a half troop of Chasseurs, a ford across the river had been discovered, outflanking the entire Prussian position.
Looking to make the most of this momentum, the French commander ordered another headlong charge into the Prussian Musketeer group which had just arrived from the village. With no space or time to reorganize things on the narrow bridge, the charge was again led by the Grenadiers, now at half strength. They crashed in to the Musketeers in a 7 vs 7 dice fight. The French won by one (killing 4 plus 3 Shock, suffering 3 dead and 1 Shock) so the stubborn Musketeers fought again. This time 7 French dice faced 2 Prussian and the Musketeers were sent reeling back, taking their officer with them and dropping Prussian Force Morale to 8.
Over on the left, the French dragoons had formed up in front of the bridge, waiting for the Voltigeurs to disrupt the defenders enough to make a charge viable. The Voltigeurs started up long range skirmishing, but to little effect.
All quiet on the left flank
Again the French used 4 Command Cards to reactivate the infantry commander, who redeployed his command. The sole surviving Grenadier was pulled back to the bridge, two Fusilier companies turned to the left to face the Prussian artillery and Jaegers and the remaining two formed up to head for the village.
The Prussians used the same trick to activate their artillery, which fired its final round of canister at the French infantry, causing 2 kills and 6 shock across the two groups.
Turn 4
A short turn began with a Prussian dilemma. They had two Command Cards and could activate one unit. Should the Jaegers fire on the Fusiliers and try to add enough damage to break them, or the Hussars charge the Fusiliers before they are simply shot out of the saddle?
I went with the Hussars.
Bad call. The charging hussars ended up with 9 dice to the French 15, losing 5 dead to only 2 Frenchmen. They broke and fled all the way back to the village, taking their wounded leader with them.
Before the turn ended there was just time for some more ineffective musketry on the left flank and for the Chasseurs to sort themselves out at the ford and prepare to cross it.
Turn 5
The turn began with the Prussian artillery scoring 2 Shock on each of the Fusilier groups facing it, putting them on the very brink of recoiling, but not quite over it. The Fusiliers responded with a ‘First Fire’ volley that killed three of the crew and sent the survivors running. Prussian Force Morale dropped to 4, so they lost 1 Command Card from the deck.
A last hurrah for the Prussian artillery
The Chasseurs urged their horses into the fast flowing river and started to cross, allowing the Prussian to now react, but before they could, the Tiffin card was drawn.
Using the remaining Command Cards, the French activated the Fusilier formation that began to head towards the village, while the Prussian Jaegers fired a final volley at the other Fusiliers and then ran for the shelter of the village. In a moment of pathos that summed up the entire Prussian day, the Jaeger officer managed to trip and twist his ankle in the rush.
Turn 6
Another short turn in which little happened. The chasseurs continued to wade their way across the ford. The Prussian Hussar officer recovered from his wound and led his depleted troop over the northern bridge to offer some token resistance to the outflanking force.
However, the early appearance of the Tiffin card drove a flurry of activity using the outstanding Command Cards. The Jaegers halted and turned to face the French, who in turn ran towards the enemy but fell tantalizingly short of contact. The Prussian Dragoon commander decided that the Musketeers at the west bridge could look after themselves and took his troop off at the gallop for the northern bridge and the approaching threat of the French Chasseurs.
Turn 7
Determined to force a result, the French used 2 Command Cards to activate the Fusiliers and charge into the Jaegers. A 12 vs 8 dice fight in favour of the French saw the Jaegers recoiling back into Dreibrücke after losing by 3 kills to 4. As they retired, they could hear behind them the clatter of the Dragoons galloping across the bridge on their way to confront the French outflanking force.
Turn 8
Clearly the denouement of this stunning French victory had been reached. A final volley from the surviving Jaegers could only inflict a little shock, which was shrugged off by the French who charged again, wiping out their Prussian foes, whose Force Morale now went to 2.
With the writing on the wall, the Musketeer leader brought his remaining group at the run from the west bridge into Dreibrücke, in an attempt to escape the closing French noose, with the French Dragoons in hot pursuit.

Musketeers exit, pursued by Dragoons.
The French Chasseurs wheeled to face the onrushing Prussian Dragoons, but would they have the chance to decide the battle with a final glorious cavalry charge?
No! The Tiffin card was drawn.
Yes! The Prussians had a Command Card remaining which they used to activate the Dragoons and send them hurtling towards the French Chasseurs.
No! The Dragoons came up an agonizing 1” short on their movement dice.
Well, sod that. It was late, the French had clearly won and I was going to have my cavalry melée.
It ended up a 17 to 15 dice fight in the French favour and the Dragoons were completely wiped out (9 kills inflicted by the French to 7 by the Prussians). Clearly their horses were exhausted by the long gallop from the other side of Dreibrücke, and outnumbered two to one they were unable to stop the French.
With only a handful of Hussars remaining to cover the retreat of that last intact group of Musketeers, the Prussian defeat looked comprehensive. Some shamefaced French artillerymen could return to recover their guns and take possession of the abandoned Prussian artillery, but the Grenadiers would never recover as a fighting unit. It might have only been a skirmish compared to Stavkstadt, but Lebasque now had a route across the river and an opportunity to rejoin Davout or….
Concluding Thoughts
As usual, Sharp Practice gave a great game despite everyone deploying so close together. Plenty of incident, the random events were unobtrusive (apart from the poor Jaeger officer and his ankle) and the outcomes did not feel unrealistic.
I always worry about using Command Cards solo, but in practice it rarely seems to be an issue. I regret not getting to use the ‘Pas de charge’ and ‘Sharp Practice’ attributes, but I find the opportunity to keep things moving, by activating the unit I want, too tempting.
Cavalry appears about as useful as a blown glass hammer, but that may be my generalship, so I’ll keep working on it. The rebasing and dice frames worked well. No fiddling about with individual 15mm figures (the micro dice were plenty fiddly) and in practice they were a lot less intrusive than they appear in some of the close up pictures. When I designed them I assumed the double frame would be for Shock, which can be double the number of figures and the single for casualties which were unlikely to exceed 6 in an 8 man unit, but in this battle I had a couple of units which took seven casualties but barely any shock. Most odd.
Right, strictly speaking up next is WWII and Scenario 5, but over the summer I have managed to complete only 5 vehicles (about 20% of the total needed) and maybe half the infantry. So you’ll probably get Scenario 6 next, which sees the wily Lebasque choosing to take the sea route home rather than fighting his way across Germany and the Low Countries.
No comments:
Post a Comment